I wanted to write in general about how to use an electric planer to trim a door or window that are hand held. You know the hardest thing about using an electric cordless or corded planer is confidence. Once we establish confidence then a little bit of technique can go a long way. Why is confidence a big deal you ask? Well wait till you’re standing over your door and you’ve marked it out. Once you remove material, putting it back is impossible to a nasty plant that wasn’t necessary in the first place.
So using a power planer the right way can be seriously exciting. I remember teaching a couple of staff looking to make the move up to the power tools stage of their career not so long ago and they cottoned on pretty quick. I’m going to give you the exact same info so that the practical element is covered and also show you a quick little video on how you can set the depth and control your cuts, as well as how to replace planer blades 🙂
How to replace planer blades: Makita cordless example but works for other major brands
Before you do anything remove all power. You never change blades with the power on.
Let’s go right off the bat and not assume you have a brand new planer. Let’s assume you’ve picked up a planer with broken blades and they need changing. Firstly you want to make sure that you have a set of 82mm TCT blades. You can get these for a fiver from Toolstation and they are always reversible which is a right win. This means that if you’re fortunate enough to not hit anything too big you’ll get a couple of goes out of them.

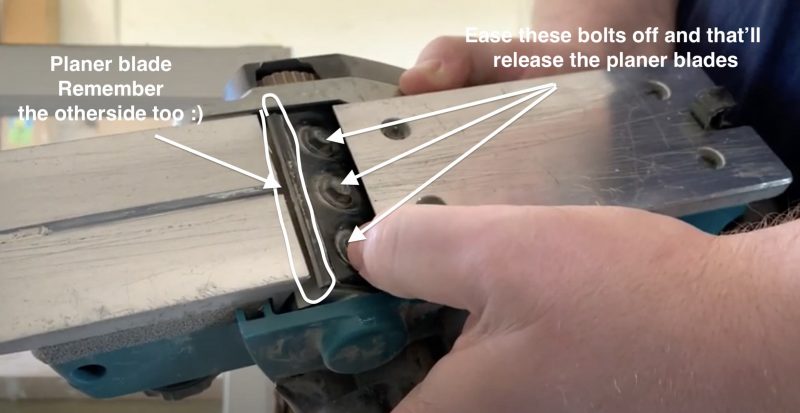
In the case of my Makita cordless planer which by the way is hands down the best cordless planer in the UK, you simply need to undo the bolts holding the drum, which is holding the blades. This sounds complicated but a quick picture with a few arrows below will clear this up. Incidentally if you watch my short review/test of the power planer that’s old you’ll notice my drum plates are bent. I can still set my planer blades true with no problems.
How to set electric hand planer blades
Undo those bolts, loosen them off enough that you can slide the blade out, don’t fully undo them as you’ll have to put all the plates back together. Then make sure the blades are held into the grooves ass you tighten up. Spin the barrel a few times to make sure nothing is catching. If you’ve misaligned the blades either width or height then the planer will spit them out in pieces as soon as you turn it on 😀 Give it an eye against the plate, you will see if they are out considerably. A new planer won’t have this issue at all.
How do you use a hand held electric planer?
The art of planing is in setting your planer blades so that you know exactly how much material you are removing. A couple of the blades that actually remove exactly how much material is state on the adjuster are the Makita cordless planer and the DeWalt cordless planer. Both of these are solid and reliable brands. If you’re intending on doing any serious amount of work then you definitely want to be looking at these collections closely.
I’m a Makita fan, I feel they have the edge over Dewalt for various reasons but mainly, they were ahead and brought out their trim cordless router first 🙂 which is an absolute game changing tool.
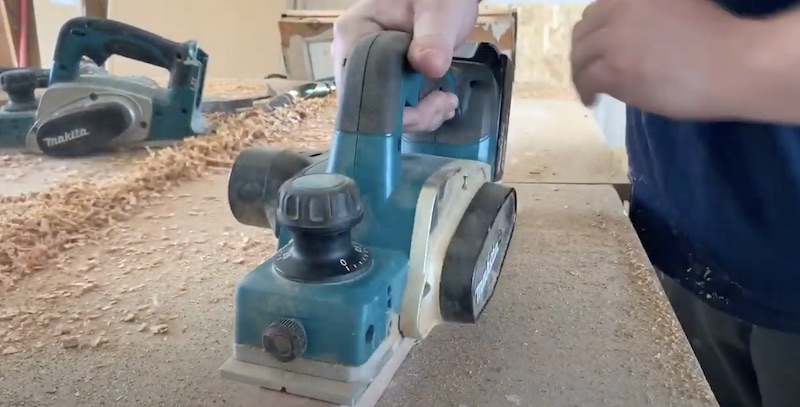
So sorry, back on track, set the height you want to plane, Geta firm hold of your timber, obviously keep your hands well out of the way of the blades, and then allow the planer to come up to full revs. If you put the planer blade against the timber as it starts you’ll get kicked and thrown off. I’m not even going to show you an example of that because it may break a set of planer blades if the timber is solid enough! You’ll get away with that on Pine but it’ll look ugly.
Here’s a link of using this planer for those on a mobile device.
Electric hand planer tricks
Key tricks:
- Never plane over end grain, you’ll rip the end off timber. If you’re doing something like a door or a sash then you need to stop short ing the end grain, turn the door around and then plane the other direction. Let’s say it’s the side of the door with no end grain, then you can keep going with one continuous sweep.
- Don’t lift your planer, go along steady and true using a decent planer in this case means you’ll know exactly how much material you are removing.
- Mark your timber before planing to be sure you know exactly what you’re removing. You simply cannot make a mistake if you follow this piece of information. Make sure the pencil mark is clear and heavy.
- If you’re taking the edge off timber be sure to use the chamfer groove under the planer. All have them, some of the best cordless planers now have multiple grooves
- Allow your planer to come up to power before striking timber. This will stop a nasty mess and a kick. IT’ll also save you at best dulling your blades and at worst case totally smashing them to pieces – this is speaking from experience a long time ago.
- Make sure your blades are firmly tightened in. Otherwise, if loose, they break up and give an inaccurate cut.
How to use an electric planer to trim a door or window
Taking a look at your planer tricks, you’ll see we are about to incorporate those into the how to use an electric planer to trim a door or window section.
Make your mark on the door. Offer your door up and be sure you know exactly what material you need to remove. This is a kind of one time only gig. You want to get it right the first time. Not too much material, but also, you don’t want to offer this thing in, 6/7 times. A couple will be absolute tops. Normally I will only ever mark once and that’s good. It all comes down to the marking.
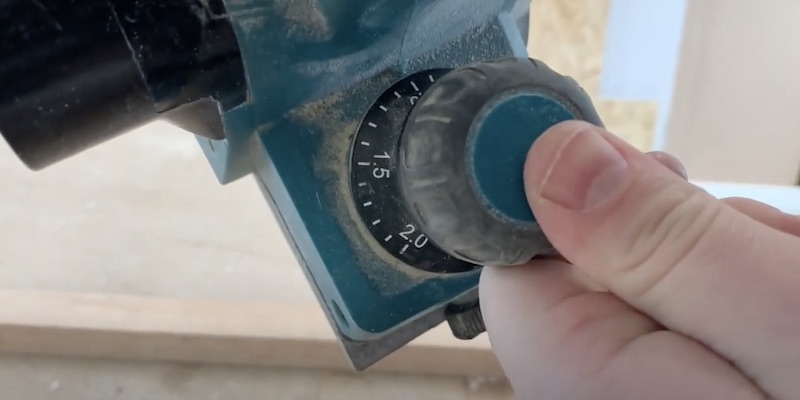
Set your depth appropriately. On cordless equipment you probably want to plane in 1mm increments, this is the easiest to count and keep a gauge on. This is how I do it unless I need to remove a serious amount of material. It’s the depth I set my planer to on hardwood and the same as you can see in the video link above or the pic below:

Remove your material following the key tricks. If you need to plane over end grain, ensure you turn the door over and come back across and meet a cut. Follow these points on how to use a cordless electric planer and you’ll be good to go!
